Tuesday, May 1, 2018

4th Grade Fantasy Characters

It is towards the end of the year, and my 4th grade classes have big numbers. This makes it difficult to do 3D projects since there isn't much space. I lost my big storage closests, so I finding space to even store 3D projects is hard at the same time as well. Some of my kids really like to draw dragons and these other random characters. I tried to think of something that would gravate towards them so I decided to do Fantasy creatures.

Materials Needed

6 x 18" Paper
Pencils
Sharpies (Thick/Thin)
Watercolors
Colored Pencils
Paintbrushes

Day 1#- I introduced Salvador Dali to my students who was famous for the Surrealism movement. This is how I tied in my Art History component for the unit. I talked my students about the creatures they were to create needed to have a head, body, and legs. I gave my students a 6 x18" piece of paper that was folded into 3 parts. This would help kids with proportion and making sure their creature was to scale. (1. Head 2. Body. 3 Legs). I also provided them with a handout of some animal heads to get their imagination started.


Day #2- I discussed Surrealism with my students again, and encouraged them to continue working on the body and legs. Once students finished drawing their actual creatures, I also had them think of the background. What kind of environment would you see most likely see their creature? I distributed both thin and thick sharpies so they could go over their pencil drawings.


Day #3 I had the students color in their works with colored pencil, we recently finished a unit on creating value, so they knew how to create it. I had them color their creature with colored pencil, and then use watercolor to paint the backgrounds. They turned out really well! I would definitely do this project again!


Monday, April 30, 2018

Classroom Posters

So, this year I have had alot of my students stabbing and writing on my erasers. I often order the big pink erasers from Sax School Speciality or Dick Blick. I cut them in half with scissors so I can more bang for my buck. I found this poster idea from Pinterest, and created it for my classroom


3rd Grade Egyptian Scenes

3rd Grade Egyptian Scenes

Materials Needed
Paint Brushes
Tempera Paint (Flourescent Yellow, Orange, Pink)
12 x18" Kraft Paper
Construction Paper Crayons
Burnt Sienna/Tan Crayons
Brown Chalk Pastels
Q-Tips

I have recently become very inspired by Egyptian Art. The Walters Art Museum in Baltimore, MD has an awesome collection on display. This unit focuses on Value and Form. The first day of the lesson, I introduced Egyptian art. I talked about how pyramids were built, and how most of the land is made up of desert. We reviewed both shape and form. In Art, pyramids are considered as form in art because they are 3-Dimensional. We started by practicing how to draw pyramids before we started on our final copy. When students felt ready, I gave them a  12x 18" piece of kraft paper.  I reminded students about when the start to draw their pyramids, that ones closer to us would be bigger and ones farther away would be smaller (space). I encouraged them to draw at least 3 pyramids.


On the second day of this unit, students finished drawing their pyramids, I had them draw some camels too! I talked about value and how students were to use brown, tan, and peach colors on the pyramids to create value. I showed them how to blend the crayons in. When the students were done coloring in their pyramids, they used brown and orange chalk pastels to add sand to the bottom of their pieces. I demonstrated how to use q-tips to help smear the chalk pastels around the pyramids. The q-tips also help keep the students' hands clean.


On the final day of this unit, I had the students use flourecent yellow, pink, and orange tempera paints to paint in the sky of their works. I encouraged them to blend the colors together to make the sunset.


Thursday, April 5, 2018

4th Grade-Jim Bachor

I am currently trying a new lesson with my 4th graders. The class sizes are really big this year so I can't do projects that are too extrenous. I also am low on storage space due to construction at my school. I had heard of this artist named Jim Bachor, who fills pot-holes on the streets of Chicago with beautiful mosaics. I work with glass personally and make mosiacs myself, so it is nice to relate to someone. A lot of Jim Bachor's work is images of food (popsicles, chips, and drinks). I thought it would be cool to have my students make their own works inspired by him. I found a Good Morning ABC video, where they interviewed Jim Bachor about his work. My kids thought it was soo cool.

Materials Needed
Colored Pencils
9x12 drawing paper
9x 12 grey construction paper
Texture Plates
Pencils
Rubbing Crayons


Day 1: I had the students begin to do two sketches of certain food items that they would want to draw for their own personal pieces. As they drew, I encouraged my advanced students to start practice shading and adding value to their sketches


Day 2: With the practice of drawing their particular food items, I talked about value and shading again. In this instance, I had my students complete a value scale to help them practice shading (from light to dark). With my teacher example I made, I showed how students should start layering their particular food items. When they completed their value scales, I gave them a piece of 9x12 drawing paper, and their sketches from day one. They were to enlarge one of their drawings for their final on the 9x 12" paper.


Day 3/4: The students continued to work on their large food drawings onto a 9x12" piece of paper using colored pencils. I reviewed value and contrast with them. When finished sketching their food, students used texture plates and Crayola ColorSticks (white, grey, and black) to create texture on a gray 9x 12" construction piece of paper to make it look like pavement. Students cut out their original sketches and glued it on.


Wednesday, March 7, 2018

1st Grade-Chinese Dog Cages

Dog Cage, China, 1736-1795  (c) The Philadelphia Museum of Art. This elaborate dog cage epitomizes the luxurious life of the imperial court during the long reign of the Qianlong emperor, when the extravagant display of wealth extended even to the accouterments of the imperial kennels. The body of the cage is decorated with the intricate enameling technique known as cloisonné. A miniature palace on wheels!
On one of my many visits to the Philadelphia Museum of Art, I came across this piece. It is a dog cage that was said to be made for one of the emperor's pet dogs. This is where I got the idea to create a whole lesson based upon it. I did this lesson last year and it turned out really cute. It so happens that in the Chinese Zodiac, that 2018 is the year of the dog. I figured this would a great opportunity to do this lesson again.

Materials Needed
 12 x18" Construction Paper
Gold/Bronze Tempera Paint
Paint Brushes
Brown/Black/White Tempera Paint
Oil Pastels


Image result for rubys chinese new yearThe lesson started with me reading "Ruby's Chinese New Year" to my students. In this book, Ruby goes on a journey to visit her grandmother for Chinese New Year. Along the way, she meets all of these different animals (these animals are the ones found in the Chinese Zodiac). The kids got really into it and then I showed them the dog cage. I talked about what a Chinese "Emperor" was and what the cage was used for. We then started to paint the actual dog cage using gold tempera paint on a 12 x18" piece of red construction paper.


The second day of this lesson, I reviewed what an emperor was. I also talked about shape because we were painting the actual dog that was going to be in the cage. Using pencils, I passed back their paintings from the previous week, We started with an oval for the body, circle for the head, and four long ovals for the legs, We then painted the ears and tail. I gave students several different colors of tempera paint (white, brown, dark brown, and golden-yellow).


The third day of the lesson was adding the features of the dog (eyes, nose, mouth) using oil pastels. I encourage my students to add a collar, crown, and items for their dog. I also have them decorate the cage!


Thursday, March 1, 2018

4th Grade-Underground Railroad Freedom Quilts


Materials Needed
12x 12" Black Construction Paper
4x 4" various colors of construction paper
3x 3" various colors of construction paper
metallic markers (optional)
colored pencils
glue
scissors

For Black History Month, I decided to try Freedom Quilts with my 4th graders. The Underground Railroad actually ran across here in the state of Maryland, therefore I thought this would a great topic! Harriet Tubman was born on the Eastern shore of Maryland as well, so I wanted to focus on famous African-American figures from the area. Freedom Quilts played a significant role in the Underground Railroad because they served as signs/signals for those runaway slaves that were running away towards their "freedom." I discussed this on the first day and showed students the different signals used on the freedom quilts, and what they stood for.  ( see below)

Underground Railroad Quilt Patterns Templates | Sue's Underground Railroad Quilt | Quilted JoyQuilted Joy

Students looked at this handout and filled it out to help plan how their designs would turn out


Day 2/3-Using their handouts, I had the students fold their 12x 12" pieces of black construction paper two times to make 4 equal  6x6" squares.  I gave students several different colors of  4x4" squares to start creating their chosen signals. I demonstrated how they could fold the 4x4" squares diagonally to make triangles. I also gave students 3 x3" squares in case if they wanted to layer different colors on top to add more color. They were also allowed to use metallic markers to add some more "pizzaz" if they wanted. The students seemed to really enjoy this project!


Wednesday, February 14, 2018

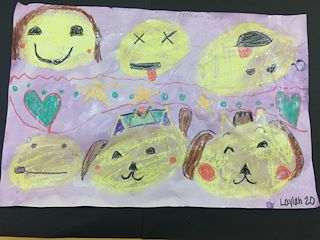
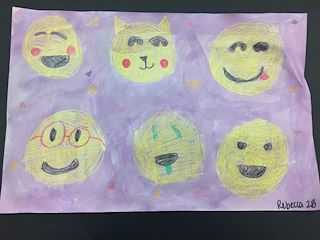
2nd Grade- "How We Express Ourselves" Emojicons Project

This a brand new project I did with second graders this past year. I discussed how people use art to express themselves using symbols. My students love emoji-cons, so I had them draw them.  The materials needed for this project are

Black Crayons
Construction Paper Crayons
Watered Down Sax Perscalent Tempera Paint
12 x18" paper
paint brushes

Image result for sax pearlascent


The first day of this project, students drew six circles to serve as their emojicons using construction paper crayons. I had them draw 3 on the top row of their 12 x18" paper and 3 on the bottom. I then instructed them to start drawing different emojicons (they each had to a different one). This took 1 class period.

During the second class period, students then added the eyes and mouths of their emojicons. To finish their pieces, I gave them watered-down Sax Pearlascent Paint, to give some color to the backgrounds of their paper. The end result ended up like this


3rd Grade: Gustav Klimt "Tree of Life" Citizen Trees

My school is a PYP/IB school and for 3rd grade the classroom teachers are focusing on "Who We Are" in terms of citizens and the ro...